The Witcher 3 Abilities
Abilities in The Witcher 3 are gained and upgraded after you’ve gathered a certain amount of experience. There are four talent trees to choose from – combat, signs, alchemy and general.
When choosing which skills to invest in, keep in mind that you won’t be able to max them all out. You will have to pick those that complement your play style. If you want to see how it looks in practice, take a look at our skill calculator.
Mutagens are special items that allow further specialization by scaling with abilities. In this guide, we’re going to show you all the Witcher 3 skills you can choose, their effects and mutagens that go well with them.

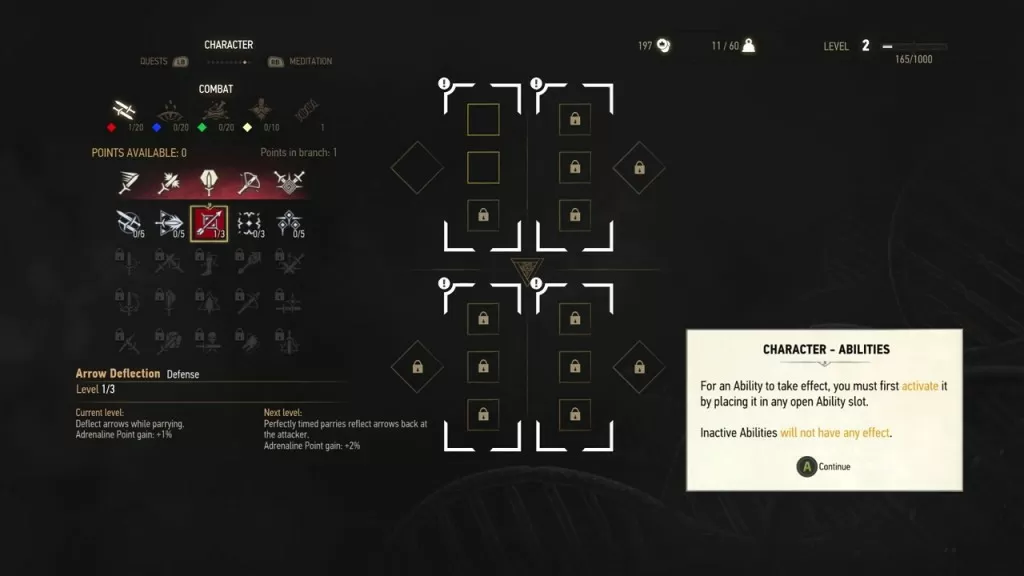
Just upgrading them won’t be enough – if you want them to take effect, you’ll need to place them into ability slots. You’ll start out with only a few slots available, but you’ll unlock more as you progress through the game. While progressing through the game you’ll unlock 12 slots and the last one will be opened up when you reach level 50. You can switch the active skills at will, depending on the problems you’re facing – if you’re fighting an enemy with a weakness to fire, you can replace the Arrow Deflection with a skill that improves Igni intensity.
You gain one skill point each time you level up. Additionally, visiting a Place of Power can grant you a “free” point. These places are scattered across the world, hidden from view and hard to get to. If you’re not happy with your chosen abilities, you can supposedly buy a respec potion that will allow you to redistribute your skill points.
 For example, if your mutagen is green, you should pair it with Alchemy abilities, which are also green. That way, the bonuses you get from them will be bigger and better. You can switch mutagens whenever you like, so there’s no danger of choosing the wrong ones.
Mutagens are special items that allow further specialization by scaling with abilities. In this guide, we’re going to show you all the Witcher 3 skills you can choose, their effects and mutagens that go well with them.

Just upgrading them won’t be enough – if you want them to take effect, you’ll need to place them into ability slots. You’ll start out with only a few slots available, but you’ll unlock more as you progress through the game. While progressing through the game you’ll unlock 12 slots and the last one will be opened up when you reach level 50. You can switch the active skills at will, depending on the problems you’re facing – if you’re fighting an enemy with a weakness to fire, you can replace the Arrow Deflection with a skill that improves Igni intensity.
You gain one skill point each time you level up. Additionally, visiting a Place of Power can grant you a “free” point. These places are scattered across the world, hidden from view and hard to get to. If you’re not happy with your chosen abilities, you can supposedly buy a respec potion that will allow you to redistribute your skill points.
Combat Skills (red)
The first group of skills is dedicated to combat – they improve your swordsmanship, allow you to use crossbows more effectively and govern your adrenaline gains. There are five talent trees in this category: Fast Attack, Strong Attack, Defense, Marksmanship and Battle Trance. Investing 8 points into it unlocks the second tier, 20 unlocks the third and 30 unlocks the fourth.| Icon | Name | Description |
|---|---|---|
| Muscle Memory Fast Attack | Level 1: Fast attack damage +5%, adrenaline point gain +1%. Level 2: Fast attack damage +10%, adrenaline point gain +2%. Level 3: Fast attack damage +15%, adrenaline point gain +3%. | |
| Precise Blows Fast Attack | Level 2: Fast attack critical chance +4%, critical damage +30%, adrenaline gain +2%. Level 3: Fast attack critical chance +6%, critical damage +45%, adrenaline gain +3%. Level 5: Fast attack critical chance +10%, critical damage +75%, adrenaline gain +5%. | |
| Whirl Fast Attack | Level 2: Spinning attack that strikes everyone around you. Maintaining consumes stamina and adrenaline. Consumes 20% less stamina and adrenaline, adrenaline point gain +2%. Level 3: Consumes 30% less stamina and adrenaline, adrenaline point gain +3%. | |
| Crippling Strikes Fast Attack | Level 1: Inflicts bleeding. Enemies lose 25 Vitality per second for 5 seconds, adrenaline point gain: +1%. | |
| Strength Training Strong Attack | Level 1: Strong attack damage +5%, adrenaline point gain +1%. | |
| Crushing Blows Strong Attack | Level 2: Strong attack critical chance +4%, critical damage +30%, adrenaline point gain +2%. Level 3: Strong attack critical chance +6%, critical damage +45%, adrenaline point gain +3%. | |
| Rend Strong Attack | Level 2: Do more damage in proportion to consumed stamina. Ignores enemy defense, critical chance +20%, adrenaline points increase damage by 100%, adrenaline point gain +2%. Level 3: Critical chance +30%, adrenaline gain +3%. | |
| Sunder Armor Strong Attack | Level 2: Enemy damage resistance -10%, adrenaline point gain +2%. Level 3: Enemy damage resistance -15%, adrenaline point gain +3%. | |
| Arrow Deflection Defense | Level 1: Deflect arrows while parrying, adrenaline point gain +1%. Level 2: Perfectly timed parries reflect arrows back at the enemies, adrenaline point gain +2%. Level 3: Perfectly timed parries reflect arrows, deal double damage, adrenaline point gain +3%. | |
| Fleet Footed Defense | Level 2: Damage from hits while dodging -40%, adrenaline points gain +2%. Level 3: Damage from hits while dodging -60%, adrenaline points gain +3%. | |
| Counterattack Defense | Level 2: Attack after successful counter does +30% damage per skill level, knock-down chance based on adrenaline, adrenaline point gain +2%. Level 3: Attack after successful counter is always critical, does +45% damage per skill level, adrenaline point gain +3%. | |
| Deadly Precision Defense | Level 2: Instant kill chance +2% per adrenaline point, adrenaline gain +2%. | |
| Lightning Reflexes Marksmanship | Level 1: Slows time by another 15% while aiming the crossbow, adrenaline point gain +1%. | |
| Cold Blood Marksmanship | Level 2: Adrenaline points +0.08 per bolt hit, adrenaline points gain +2%. Level 3: Adrenaline points +0.12 per bolt hit, adrenaline points gain +3%. | |
| Anatomical Knowledge Marksmanship | Level 2: Critical chance with crossbow +10%, adrenaline points gain +2%. Level 3: Critical chance with crossbow +15%, adrenaline points gain +3%. | |
| Crippling shot Marksmanship | Level 2: Critical hit from crossbow disables target’s special abilities for 10 seconds, adrenaline point gain +2%. Level 3: Critical hit from crossbow disables target’s special abilities for 15 seconds, adrenaline point gain +3%. | |
| Resolve Battle Trance | Level 1: Adrenaline point loss after taking damage -20%, adrenaline point gain +1%. | |
| Undying Battle Trance | Level 2: When Vitality is 0, adrenaline is consumed to restore it. Amount is based on adrenaline points +25%, adrenaline point gain +2%. Level 3: Amount is based on adrenaline points +50%, adrenaline point gain +3%. | |
| Razor Focus Battle Trance | Level 2: Gain 1 adrenaline point when entering combat. Adrenaline point gain from sword hits + 10%, adrenaline points gain +2%. Level 3: Adrenaline point gain from sword hits + 15%, adrenaline points gain +3%. Level 5: Adrenaline point gain from sword hits + 25%, adrenaline points gain +5%. | |
| Flood Of Anger Battle Trance | Level 1: When casting a Sign, 3 adrenaline points will be consumed to upgrade the Sign to the highest level (unlocking all bonuses) with intensity +25%, adrenaline point gain: +1%. |
Sign Abilities (blue)
The second group of skills are magic-related skills, or Signs– they help you use signs more efficiently by enhancing their intensity, range or area of effect. There are five abilities in this talent tree, each tied to one of the signs: Aard, Igni, Axii, Yrden and Quen. After putting 8 ability points into this group you’ll unlock the second tier, after 18 you’ll get access to the third, and once you spend 28 you’ll unlock the fourth.| Icon | Name | Description |
|---|---|---|
| Far-Reaching Aard Aard Sign | Level 1: Aard range +1, stamina regeneration in combat +0.5. Level 3: Aard range +3, stamina regeneration in combat +1.5 | |
| Aard Sweep Aard Sign | Level 3: Alternate mode, strikes all opponents in radius, stamina regeneration +1.5 | |
| Aard Intensity Aard Sign | Level 1: Aard intensity +5%, stamina regeneration in combat +0.5. | |
| Shockwave Aard Sign | Level 1: Damage +40, stamina regeneration in combat +0.5. | |
| Melt Armor Igni Sign | Level 2: Damage weakens armor, effect scales with intensity up to 30%, stamina regeneration +1. Level 3: Effect scales with intensity up to 45%, stamina regenration +1.5. | |
| Firestream Igni Sign | Level 2: Damage weakens armor, effect scales with intensity up to 30%, stamina regeneration +1. Level 3: Effect scales with intensity up to 45%, stamina regeneration +1.5. | |
| Igni Intensity Igni Sign | Level 1: Igni intensity +5%, stamina regeneration in combat + 0.5 | |
| Pyromaniac Igni Sign | Level 1: Chance of igniting enemy +20%, stamina regeneration in combat +0.5. | |
| Sustained Glyphs Yrden Sign | Level 2: Duration +10 sec, 4 alternate mode charges, 2 standard mode traps, stamina regeneration +1. | |
| Magic Trap Yrden Sign | Level 2: Alternate mode, damages and slows enemies in 12 yard radius, destroys projectiles in area, damage +25%, stamina regeneration +1. Level 3: Damages and slows enemies in 14 yard radius, destroys projectiles in area, damage +50%, stamina regeneration +1.5. | |
| Yrden Intensity Yrden Sign | Level 1: Yrden intensity +5%, combat stamina regeneration +0.5. | |
| Supercharged Glyphs Yrden Sign | Level 1: Enemies lose 10 health per second in trap, stamina regeneration in combat +0.5 | |
| Exploding Shield Quen Sign | Level 1: Shield pushes enemies back when breaking, stamina regeneration in combat +0.5 Level 2: Shield pushes back and damages enemies when breaking, stamina regenarion in combat +1 Level 3: Shield pushes back and damages enemies when breaking, with a knockdown chance, stamina regeneration in combat +1.5 | |
| Active Shield Quen Sign | Level 3: Alternate mode, maintaining an active shield doesn’t drain stamina (except when hit), absorbed damage restores Vitality, stamina regeneration +1.5. | |
| Quen Intensity Quen Sign | Level 2: Quen intensity +10%, stamina regeneration +1. Level 3: Quen intensity +15%, stamina regeneration +1.5. | |
| Quen Discharge Quen Sign | Level 4: Reflects 20% damage to attacker, stamina regeneration in combat +2. Level 5: Reflects 25% damage to attacker, stamina regeneration in combat +2.5. | |
| Delusion Axii Sign | Level 1: Target doesn’t move towards Geralt, stamina regeneration in combat +0.5. | |
| Puppet Axii Sign | Level 2: Alternate mode, targeted enemy briefly becomes ally, deals 40% more damage, stamina regeneration in combat +1. Level 3: Targeted enemy briefly becomes ally, deals 60% more damage, stamina regeneration in combat +1.5. | |
| Axii Intensity Axii Sign | Level 1: Axii intensity +5%, combat stamina regeneration +0.5. | |
| Domination Axii Sign | Level 1: Affects 2 enemies, with 50% reduced intensity, combat stamina regeneration +0.5. |
Alchemy Skills (green)
Alchemy skills represent the third group. They allow you to brew potions, make oils and bombs and regulate your toxicity. This talent tree consists of five abilities: Brewing, Oil Preparation, Bomb Creation, Mutation and Trial of The Grasses. Investing 8 points into the group opens up the second tier, 20 opens the third, while 28 unlocks the fourth.| Icon | Name | Description |
|---|---|---|
| Heightened Tolerance Brewing | Level 1: Potion overdose threshold +1%, potion duration time +5%. Level 2: Potion overdose threshold +2%, potion duration time +10%. Level 3: Potion overdose threshold +3%, potion duration time +15%. | |
| Refreshment Brewing | Level 2: Each potion heals 10% of max Vitality, potion duration +10%. Level 3: Each potion heals 15% of max Vitality, potion duration +15%. | |
| Delayed Recovery Brewing | Level 1: Effects of potions don’t stop while Toxicity is over 90, potion duration +5%. | |
| Side Effects Brewing | Level 5: Drinking a potion adds effect of another random potion without Toxicity cost, potion duration +25%. | |
| Poisoned Blades Oil Preparation | Level 1: Chance of poisoning the enemy with oiled blade +5%, potion duration time +5%. Level 2: Chance of poisoning the enemy with oiled blade +10%, potion duration time +10%. Level 3: Chance of poisoning the enemy with oiled blade +15%, potion duration time +15%. | |
| Protective Coating Oil Preparation | Level 1: Protection from attacks of the monster vulnerable to the oil +5%, potion duration +5%. Level 2: Protection from attacks of the monster vulnerable to the oil +10%, potion duration +10%. Level 3: Protection from attacks of the monster vulnerable to the oil +15%, potion duration +15%. | |
| Fixative Oil Preparation | Level 1: Oils have 33% more charges, potion duration +5%. | |
| Hunter Instinct Oil Preparation | Level 1: With max adrenaline, you do +20% critical damage to monsters vulnerable to that oil, potion duration +5%. | |
| Steady Aim Bomb Creation | Level 1: Slows time by another 15% while aiming bombs, potion duration time +5%. | |
| Pyrotechnics Bomb Creation | Level 1: Bombs without damage do 30 damage, potion duration +5%. Level 2: Bombs without damage do 60 damage, potion duration +10%. Level 3: Bombs without damage do 90 damage, potion duration +15%. | |
| Efficiency Bomb Creation | Level 3: Max number of bombs in each slot +3, potion duration +15%. Level 4: Max number of bombs in each slot +4, potion duration +20%. | |
| Cluster Bombs Bomb Creation | Level 3: Bombs separate into 4 new bombs after exploding, potion duration +15%. Level 4: Bombs separate into 5 new bombs after exploding, potion duration +20%. | |
| Acquired Tolerance Mutation | Level 1: Max Toxicity +1 for every lvl 1 alchemy formula you know, potion duration time +5%. | |
| Tissue Transmutation Mutation | Level 1: Mutagen decoction gives +200 max Vitality for its duration, potion duration +5%. | |
| Synergy Mutation | Level 5: Mutagen bonus +50%, potion duration +25%. | |
| Adaptation Mutation | Level 1: Decoction duration +10%, potion duration +5%. | |
| Frenzy Trial of The Grasses | Level 1: If potion Toxicity is above 0, time slows when an enemy is about to counterattack, potion duration time +5%. Level 2: Slow effect and duration greater than level 1, potion duration +10%. Level 3: Slow effect and duration greater than level 2, potion duration +15%. | |
| Endure Pain Trial of The Grasses | Level 2: Max Vitality +20% when Toxicity is over threshold, potion duration +10%. Level 3: Max Vitality +30% when Toxicity is over threshold, potion duration +15%. | |
| Fast Metabolism Trial of The Grasses | Level 1: Toxicity reduction +1/s, potion duration +5%. | |
| Killing Spree Trial of The Grasses | Level 1: If Toxicity is above 0, critical chance +10% with every kill, potion duration +5%. |
General Abilities
This category has no talent trees in it – instead, it contains ten wholly autonomous skills that give out bonuses not strictly tied to magic, brewing or fighting. Each of these abilities has only one level.| Icon | Name | Description |
|---|---|---|
| Sun And Stars | During the day, Vitality regeneration +10 points per second outside of combat. At night, Stamina regeneration +1 point per second in combat. | |
| Steady Shot | Crossbow bolt damage +25%. | |
| Survival Instinct | Maximum Vitality +500. | |
| Rage Management | If stamina is too low, you can use adrenaline points to cast signs. | |
| Cat School Techniques | Each piece of light armor gives +25% critical hit damage and +5% fast attack damage. | |
| Focus | Adrenaline points increase weapon damage and sign intensity. | |
| Griffin School Techniques | Each piece of medium armor gives sign intensity +5% and stamina regeneration +5%. | |
| Adrenaline Burst | Adrenaline generation +5%, using signs generates adrenaline. | |
| Bear School Techniques | Each piece of heavy armor gives max vitality +5% and strong attack damage +5%. | |
| Metabolism Control | Maximum Toxicity +30. |
Mutagens
Mutagens are special, precious items that can be used to boost Geralt’s skills. You’ll get some of them by killing rare species of monsters, like the noonwraith. There are four mutagen slots in the game – you start out with one, and unlock the others as you progress through the game. Every mutagen slot is connected to three ability slots – if their type matches, they enhance each other. They’re all colour-coded, too, which makes things a lot easier. For example, if your mutagen is green, you should pair it with Alchemy abilities, which are also green. That way, the bonuses you get from them will be bigger and better. You can switch mutagens whenever you like, so there’s no danger of choosing the wrong ones.
Hidden Abilities
The previous game had hidden skills that were unlocked in various secret ways – through dialogues, by finishing quests, performing certain actions at certain times, etc. There hasn’t been any confirmation these will be included in The Witcher 3, but we’ll investigate and let you know as soon as the game’s out.MORE CONTENT IN Witcher 3


Why are there gold boxes around some of the skill icons?
@anthony it means that these abilities are being used and enabled. You can only have a certain number of Skills active.