Skulls are modifiers in Halo 5: Guardians that add challenges to the game. They are well hidden collectibles scattered throughout many missions.
▼Article Continues Below▼
Skulls can add modifications to the gameplay or change player’s and enemy’s abilities. During co-op gameplay any unlocked collectibles including skulls will be granted to all players present at the time. Collecting skulls unlocks two achievements: Gravedigger and Gravelord.
In the video below you can find all 13 confirmed Skulls available in Halo 5:Guardians and their effects.
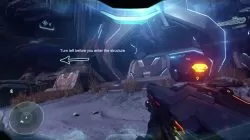
IWHBYD Skull – Osiris Mission 1
Effect: Rare combat dialog becomes more common
Location: After the battle against Prometheans, instead of going into the structure, turn left and jump onto the cliffs.
Turn left before you enter the structure
IWHBYD Osiris Skull Mission 1
Black Eye Skull – Blue Team Mission 2
Effect: Shields do not recharge until you melee enemies
Location: In the upper corner of the Reactor Room (0:39s video).
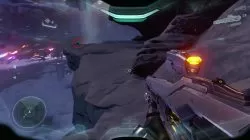
Iron Skull – Glassed Mission 3
Effect: Cannot revive/be revived
Location: You can get it only during the legendary difficulty. You have to take a tank and shoot the Phaeton Chasing the Mining Cargo. Restart Checkpoint if you miss. The skull will spawn in one of three locations. (1:37s video).
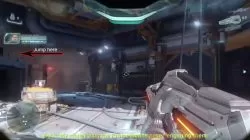
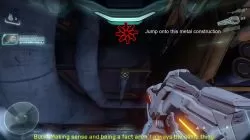
Blind Skull – Unconfirmed Mission 5
Effect: HUD and first-person arms/weapon hidden
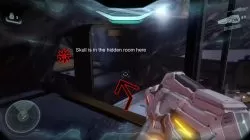
Location: In the first underground mine section, once you go through the door, turn left and jump onto crates, then onto huge pipes. Follow the metal construction and you’ll find Blind scull in the secret room.
Once you go through the door, turn left and jump onto metal construction
then jump onto metal construction on the pipes
Skull is in the hidden room
Thunderstorm Skull – Evacuation Mission 6
Effect: Enemy abilities upgraded
Location: This skull requires a trigger that can be found at the very beginning of the mission. You have to grab a Mongouse, destroy 5 construction cones during the initial evacuation to collect the skull at the end of the mission. (6:05s video)
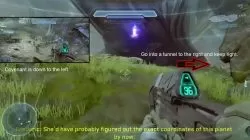
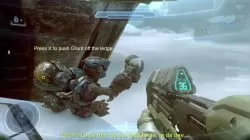
Grunt Birthday Party Skull – Reunion Mission 7
Effect: Head shot a grunt for a surprise
Location: When you first come across Covenant, turn right into the tunnel and keep right. Push Grunt off the edge and get Grunt Birthday Party Skull.
Turn right into the tunnel
Press X to push Grunt off the edge
Fog Skull – Reunion Mission 7
Effect: Motion sensor is disabled
Location: At the very end of the level instead of approaching the bridge turn right, then turn left up the hill. The Fog skull is at the end of the metal structure.
Turn right instead of going toward the bridge
At the end of this metal construction you will find the Fog skull
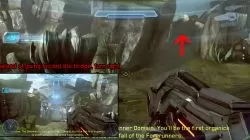
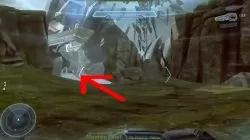
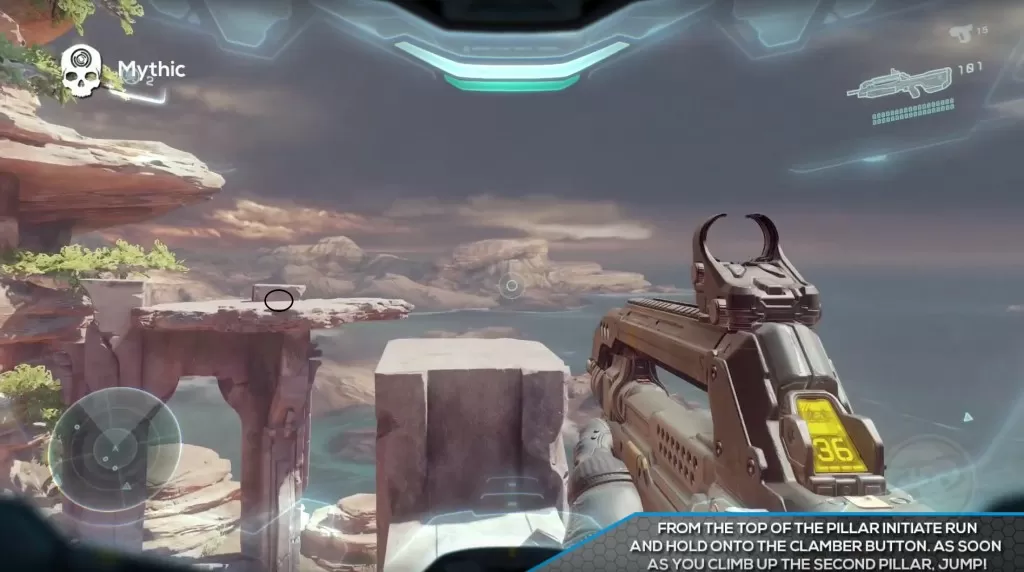
Mythic Skull – Swords of Sanghelios Mission 8
Effect: Increased enemy health
Location: While you are exiting Sanghelios ruins turn right and get on top of the archway. Go to in-game settings and make sure you have “Maintain Sprint” on. (10:21s video)Mythic skull location
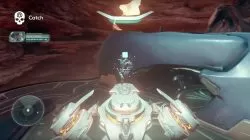
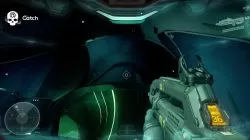
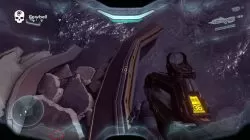
Catch Skull – Enemy Lines Mission 10
Effect: Enemies are grenade happy
Location: At the very end of the mission, fly to the Kraken. Take the entrance to the left and go down until you see a glowing green walls and a Banshee. Take the Banshee, go back in and fly upon the ledge. (11:10s video)
Go down this tunnel until you reach Banshee and green glowing walls.
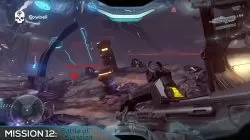
Cowbell Skull Battle Sunaion Mission 12
Effect: Acceleration from explosions increased
Location: At the end of the mission go to the very edge and jump down onto the rail. You will see the skull to your left.(12:44s video)
Go to the very edge and jump down onto the rail.
Cowbell Skull is to the left.
Famine Skull The Breaking Mission 14
Effect: Weapons drop less ammo
Tough Luck Skull Guardians Mission 15
Effect: Enemies berserk, always dive, and never flee
1 of 2 the skulls in mission 4. After you spot the first Covenant group, turn around and climb up the crashed phantom towards the left side. You’ll see a tunnel. Follow that back to a ledge where a grunt is singing. He is holding the skull.
where is the meridian station skull
Cancel that. Wrong mission.
1 of 2 the skulls in mission 4. After you spot the first Covenant group, turn around and climb up the crashed phantom towards the left side. You’ll see a tunnel. Follow that back to a ledge where a grunt is singing. He is holding the skull.